How to Create a Security Message on the DCUI Screen of an ESXi Host
Creating a message on the DCUI screen of your ESXi host can prove useful by relaying pertinent information to targeted individuals. Perhaps you want to help your staff distinguish between production and development hosts. Or perhaps you want to put up a security disclaimer deterring unauthorized access. Whatever your reasoning be, you can do so in two easy ways. Both are relatively painless, so pick your poison…
- vSphere Web Client
- ESXCLI
A few notes:
- Adding a message updates the /etc/vmware/welcome file on the host.
- When you set a message, the main DCUI screen no longer shows any default ESXi information (version, network settings, etc.).
- Setting a message on the ESXi host will also display the text on the ESXi Host Client login page.
Let’s tackle the Web Client first.
Log into vCenter or directly into your host
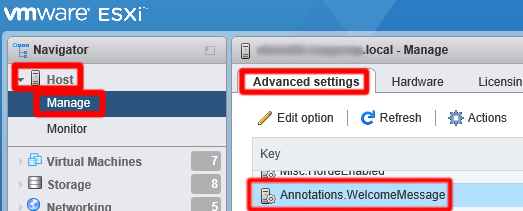
- Host Client | Host -> Manage -> Advanced Settings -> Annotations.WelcomeMessage -> Edit
- Web Client | Select Host -> Configure (Manage in 6.0) -> System -> Advanced System Settings -> Annotations.WelcomeMessage -> Edit

Next up, ESXCLi
- SSH to host
- Run this command to set message
esxcli system welcomemsg set –m=”message”
- Run this command to view message
esxcli system welcomemsg get
- Run this command to remove set message
esxcli system welcomemsg set –m=””